![[Beginner’s Guide] How to Set Up Cloudflare Turnstile for Contact Form 7](https://martto.net/en/wp-content/uploads/2026/07/Cloudflare-Turnstile_en.png "[Beginner’s Guide] How to Set Up Cloudflare Turnstile for Contact Form 7")
- Why Choose Cloudflare Turnstile Over reCAPTCHA for Contact Form 7?
- Step 1: How to Get Your Cloudflare Turnstile Site Key
- Step 2: Prepare Simple CAPTCHA with Cloudflare Turnstile Plugin
- Step 3: Connect Cloudflare Turnstile with Contact Form 7
- Conclusion: Secure Your Contact Form 7 with Cloudflare Turnstile
Why Choose Cloudflare Turnstile Over reCAPTCHA for Contact Form 7?
Until now, Google’s reCAPTCHA has been the standard for spam protection. However, Google is currently pushing to transition all users to its paid business plan (reCAPTCHA Enterprise), which brings the risk of being charged once you exceed the free limits.
Because of this, the official Contact Form 7 team highly recommends using Cloudflare Turnstile, a completely free security alternative provided by Cloudflare.
The biggest advantage of Turnstile is that your site visitors won’t have to deal with the hassle of clicking “I’m not a robot” checkboxes or selecting endless pictures of traffic lights. It automatically verifies safety in the background, providing smart spam protection while maintaining a smooth user experience.
In this guide, we will walk you through the steps to integrate this latest security feature into your contact form using the “Simple CAPTCHA with Cloudflare Turnstile” plugin.
Step 1: How to Get Your Cloudflare Turnstile Site Key
To add Turnstile to your website, you first need to get your unique two keys from the official Cloudflare website.
It might seem intimidating at first, but don’t worry! Just follow these steps, and you’ll be perfectly fine.
1. Create a Cloudflare Account
First, access the official Cloudflare website.
Click on Start building for free in the middle of the screen.

You will be taken to a screen where you can enter your email address and password to create an account. (If you already have an account, simply log in!)
2. Open the Turnstile Settings
Once logged in, your dashboard will appear.
First, make sure that Account home (the house icon) at the top left under your account name is selected.
Next, scroll down the left menu a bit, and click on Application security located under the Protect & connect group.
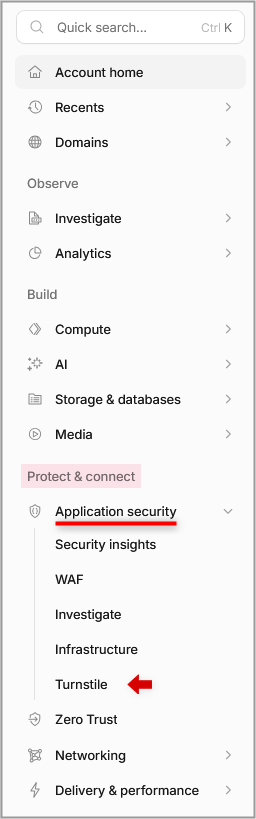
You will then see the Turnstile menu appear. Click on it!
3. Add Widget Manually
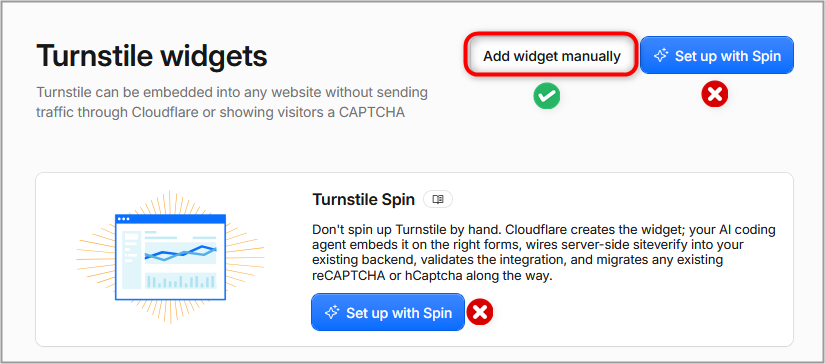
When you open the Turnstile menu, you’ll see a large blue button that says “Set up with Spin.” Please do not click this blue button!
This is a feature for developers that uses AI to rewrite code automatically, which we don’t need today. Since we are using a WordPress plugin, click the white button Add widget manually right next to it.
4. Register Your Website Details
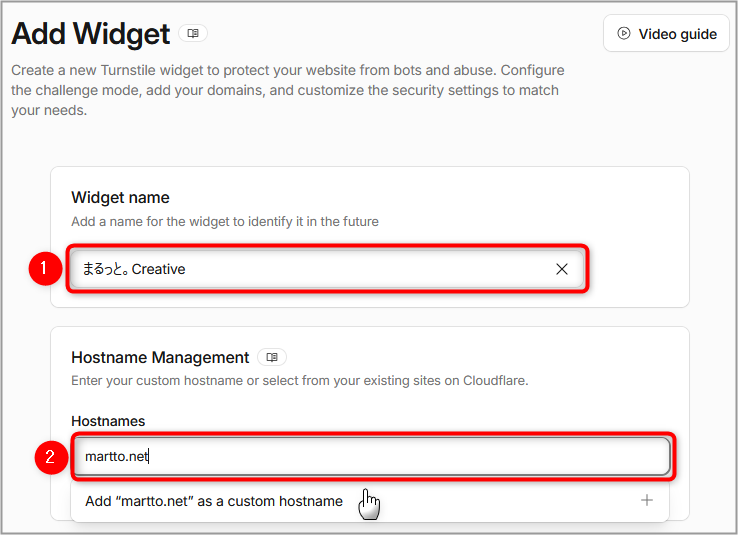
Clicking the manual add button will take you to the “Add Widget” screen. There are only four spots to fill in or check, so let’s do it together from the top!
- 1Widget name: Enter any name that is easy for you to manage later (e.g., martto.Creative). This name is only visible to you.
- 2Hostnames: Enter the URL (custom domain) of the blog where you want to place the contact form (e.g., martto.net). As you type your domain, the text Add “your domain” as a custom hostname will appear just below the input field. Be sure to click that text or press the Enter key to confirm. You’re good to go once the domain is registered like a tag in the box!
- ✅Widget Mode: The top option, Managed, is selected by default. This is the most reliable and recommended mode, which automatically handles checks and only prompts visitors when it spots suspicious activity. Keep it as is.
- ✅Skip future security rule challenges…: This setting determines whether to skip checks for 30 minutes for visitors who have already been verified as safe. Leaving it turned off (gray) is perfectly fine.
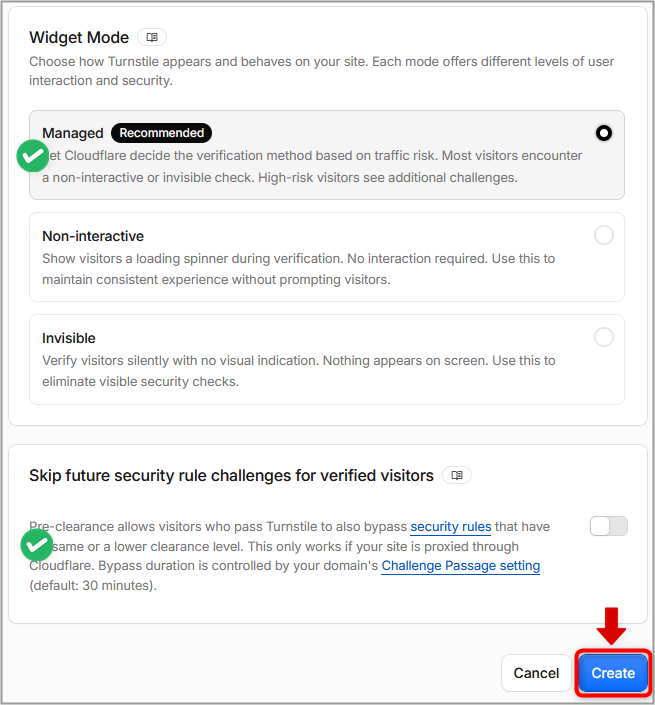
Once everything is entered and confirmed, click the blue Create button at the bottom right of the screen.
After registering your domain, you’ll see “1 out of 10” displayed. This is a handy feature that allows you to reuse one set of keys for up to 10 different domains. If you manage multiple blogs in subdirectories like “martto.net/en/”, registering just your main domain will automatically protect all the blogs under it! You can simply paste the exact same keys into the plugins of each blog. Conversely, if you want to protect a new site on a subdomain like “en.martto.net”, you will need to add that subdomain here to reuse the keys.
5. Copy Your Two Keys
The keys we need are displayed in the Integrate the widget yourself section on the right side of the screen. Click on each of the following strings to copy them.
- ▶▶Site key: Click around the input field (0x4AAAAAA…), and it will automatically copy to your clipboard.
- ▶▶Secret key: Just like above, click around the input field (0x4AAAAAA…) to copy it to your clipboard.
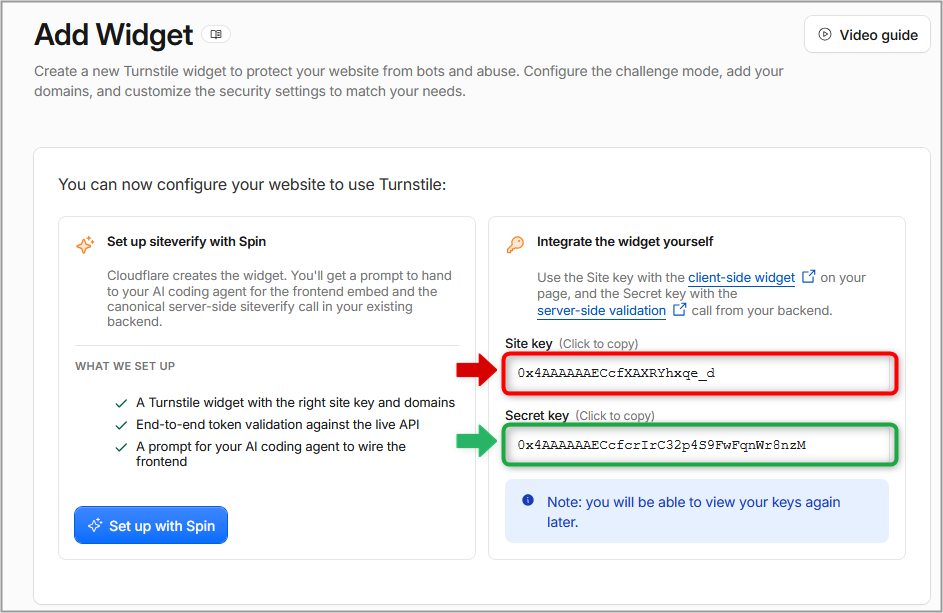
Once you’ve copied these two keys, all tasks on the Cloudflare side are complete! You can keep this screen open or paste the keys into a notepad for safekeeping, and let’s move on to the WordPress settings!
Step 2: Prepare Simple CAPTCHA with Cloudflare Turnstile Plugin
Now that you have your two keys from Cloudflare, let’s prepare the dedicated plugin on the WordPress side to receive them!
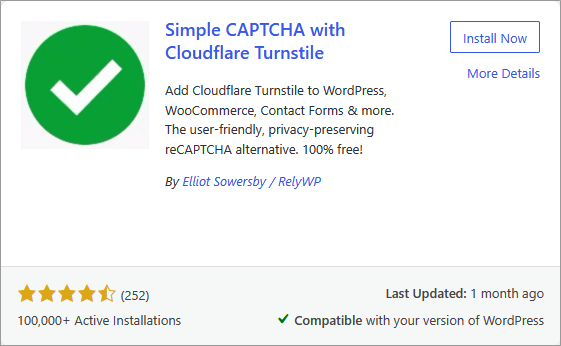
We will use a lightweight plugin called Simple CAPTCHA with Cloudflare Turnstile, which is incredibly simple to set up and easy to use.
1. Install and Activate the Plugin
First, from the left menu in your WordPress dashboard, click Plugins ➔ Add New Plugin. In the search bar at the top right, type Simple CAPTCHA with Cloudflare Turnstile. Once you spot the plugin, click the Install Now button, and then Activate it.
Step 3: Connect Cloudflare Turnstile with Contact Form 7
With the plugin activated, we’re in the home stretch! Let’s register the two keys you got from Cloudflare into WordPress and connect them properly with your contact form.
1. Open Plugin Settings
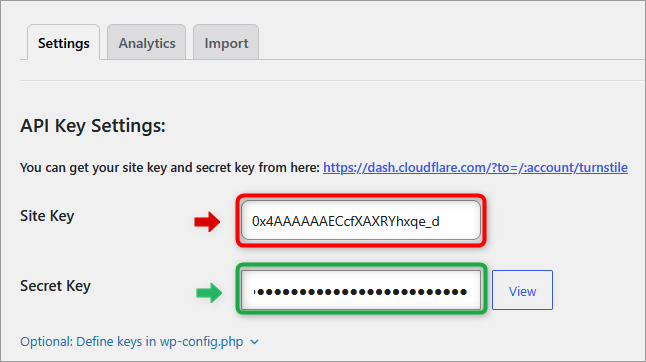
Click Settings ➔ Cloudflare Turnstile from the left menu of your WordPress dashboard to open the settings screen.
2. Paste Your Two Keys
When the screen opens, you’ll see fields ready for your keys. Accurately paste the keys you copied from Cloudflare in Step 1 here.
- ▶▶Site Key field ➔ Paste your Cloudflare Site key.
- ▶▶Secret Key field ➔ Paste your Cloudflare Secret key.
3. Enable Contact Form 7 Integration
After pasting the keys, scroll down a little and look for the “Enable Turnstile on your forms” section.
You will see a list of various plugins. Make sure to check the box for Contact Form 7 located in the lower section.
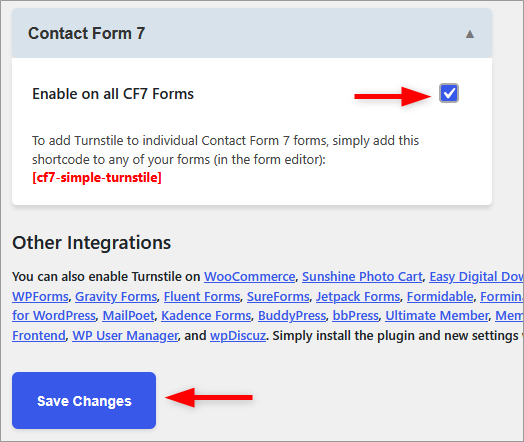
By checking just this one box, the latest Turnstile security will automatically be embedded into every contact form you’ve created with Contact Form 7!
Finally, don’t forget to click the Save Changes button at the very bottom of the screen.
4. Test Your Contact Form
Once everything is saved, let’s actually open your site’s “Contact” page to check! If you see the Cloudflare logo along with a checked Success! message right above your submit button, it proves the integration was a success!
Conclusion: Secure Your Contact Form 7 with Cloudflare Turnstile
Great job! You have now completed the entire setup for integrating Cloudflare Turnstile, the latest spam protection for Contact Form 7.
Being able to secure top-tier protection completely free of charge, without fearing Google’s paid plan risks (the shift to reCAPTCHA Enterprise), offers massive peace of mind for managing your site moving forward.
You worked hard to set up an important contact point for your site. Please use it with confidence as a wonderful place to communicate with your future customers and readers, free from the annoyance of spam emails!
![[For Beginners] How to Set Up a Contact Page in WordPress using Contact Form 7](https://martto.net/en/wp-content/uploads/2026/07/Contact-Form-7_en-1.png "[For Beginners] How to Set Up a Contact Page in WordPress using Contact Form 7")

Comments