In the previous article, we looked at what Cocoon’s default sitemap can do and explained how to customize it into a fully automatic sitemap that also supports custom post types.
This time, I’d like to explain as clearly as possible how WordPress beginners can tell AI what they want to create without getting lost along the way.
Start by Making What You Want Visible
When asking AI for help, the important thing is to communicate:
“This is what I have now.”
“This is what I want to change.”
“This is what I want the finished version to look like.”
If it is difficult to explain everything in words, you can simply draw your ideal result on a piece of paper.
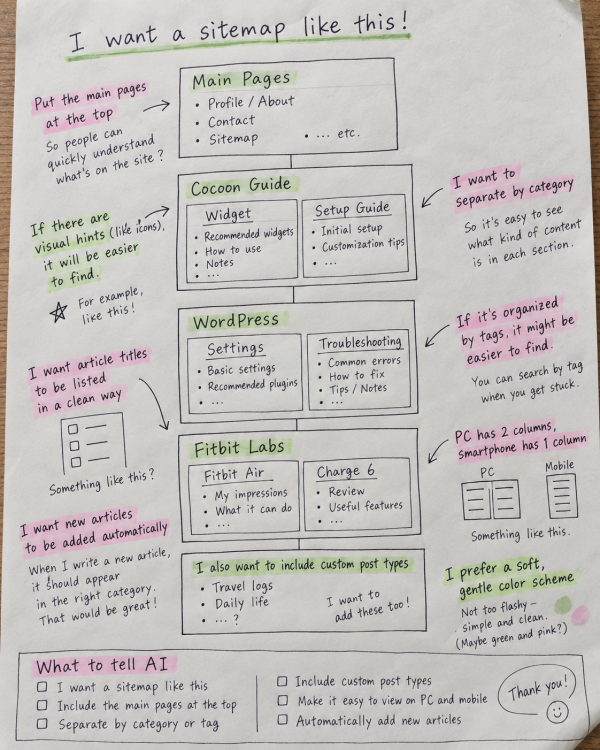
I was about to say, “Even a simple sketch like the one above is enough…” but AI actually created this one! So I definitely wouldn’t call it a “simple sketch”! 😂
It even managed to give it that casual, hand-drawn planning-note feel, which made me laugh out loud. (That is also part of what makes working with AI so much fun. lol)
In reality, your sketch can be much simpler!
“I want the pages at the top.”
“I want the posts divided by category.”
“I want to include custom post types too.”
“I want two columns on desktop and one column on smartphones.”
“I want new posts to be added automatically when I publish them.”
Requests like these can be communicated perfectly well in words.
A sketch only needs to be clear enough for you to look at it and think, “Something like this.”
Take a photo of the sketch with your smartphone or transfer it to your computer, then show it to AI.
Screenshots Make Things Even Easier to Explain
In addition to a hand-drawn mockup, showing AI a screenshot of your current WordPress screen can also be very helpful.
For example…
“This is what my sitemap looks like now.”
“I want to change this heading.”
“I want a little more space here.”
For requests like these, showing the actual screen often makes your intentions much clearer than explaining everything in words.
Check the Site Information You Need to Give AI
You can start a conversation using only a mockup or screenshot, but if you want AI to write WordPress code for you, things will go more smoothly if you provide some information about your site in advance.
For this sitemap example, the first thing to check is the category slug.
From the WordPress dashboard, go to “Posts” ➔ “Categories.”
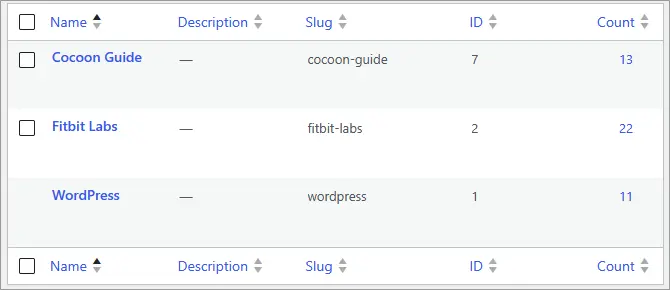
The category list shows both the “Name” and the “Slug.”
For example, a category displayed as “Cocoon Guide” may have the following slug:
cocoon-guide
Code sometimes uses this slug to specify a category.
In that case, you can tell AI:
“I want to display the category called Cocoon Guide. Its slug is cocoon-guide.”
You can also take a screenshot of your category list, like the one below, and show the image directly to AI. It can read the information from the screenshot, so you may not even need to type it yourself.
If there is something you do not understand, you do not have to guess.
Simply ask AI, “Where on this screen can I find the information I need?” and it can guide you.
Give AI All the Information Together
Once you have gathered what you need, it is time to ask AI for help.
You do not need to worry about writing a complicated “prompt” or instruction.
Simply give AI the information you have, step by step.
For example, for this sitemap, you could ask like this:
I use Cocoon. I want to create a sitemap like the hand-drawn sketch I attached.
・I want to display pages first.
・I want standard posts grouped by category.
・Within each category, I want them grouped by tag.
・I also want to display custom post types.
・I want two columns on desktop and one column on smartphones.
・When I publish a new post, I want it to be added to the sitemap automatically.
My category slugs are:
cocoon-guide
wordpress
fitbit-labs
Please explain the steps in a way that a WordPress beginner can understand.
The important thing is not to fill your request with technical terms.
As long as AI can understand what you are using, what your current situation is, and what you want to achieve, it can more easily work out the appropriate solution.
You Can Also Show AI Sample Code
In the previous article, I shared sample sitemap code currently used on this site.
You can copy that code and ask AI to adapt it to your own site.
For example…
I have some sitemap code that I would like to use as a reference. Please rewrite it so that it works with my site.
My category slugs are:
・beginner-guide
・site-customize
・plugin-tips
I also want to include a custom post type in the sitemap.
After making the changes, please return the complete code that I can copy and use, rather than only showing the parts that need to be replaced.
Then paste the code you copied, such as the sample code from the previous article, directly into the chat.
If there is something you do not know, such as the name of your custom post type, you can simply ask first:
“I don’t know the name of my custom post type. Where can I find it?”
Instead of guessing, it is safer to tell AI exactly what you do not know.
You Can Keep Asking for Changes Until It Looks Right
Even after AI gives you the code, the result may not match the design you imagined on the first try.
Check the actual page and tell AI what you would like to change, for example:
“I want a little more space between the headings.”
“I want this color to be slightly lighter.”
“I only want to change this icon.”
Screenshots are useful here too.
You can simply say:
“I want to change the part circled in red in this image.”
That allows you to ask for changes even if you do not know the technical terminology.
When asking AI to revise code, it is also helpful to say:
“Please return the complete revised code.”
This saves beginners from having to search through the code and figure out exactly which section needs to be replaced.
You do not have to complete everything with a single question.
Ask AI to create it ➔ Check the result ➔ Explain what you want changed ➔ Ask AI to revise it
By repeating this process, you can gradually bring the result closer to what you had in mind.
Also, instead of adding CSS to “Appearance” ➔ “Theme File Editor” right away, I recommend using the “Custom CSS” field at the bottom of the page editing screen first.
The reason is simple: making corrections is much easier.
And if the CSS is only needed on that particular page, you can simply keep it there.
Which AI Should You Hire for the Job?
Now comes another question: with so many AI tools available, which one should you ask to do the job?
What follows is simply based on my own experience.
Google Gemini is one of the more affordable options.
Some plans also include additional Google storage, so there are plenty of practical benefits for Android and Windows users alike.
Gemini can also be used to a certain extent for free.
ChatGPT, on the other hand, can be difficult to use extensively on the free plan. Although everyday text chat is said to be unlimited now, a long conversation within the same thread can still hit its limit fairly quickly, much as before. If you are also exchanging screenshots and other images, the free allowance can run out surprisingly fast.
So if you are simply trying AI for the first time, Gemini may be the easier place to start.
That said, the two have very different “personalities.” If you have not used them yet, I definitely recommend taking advantage of any free trial periods that may be available and actually “talking” with both of them before deciding which one suits you better!
As for me?
I had been keeping ChatGPT around as a new hire on probation, but it looks like it may finally be getting promoted to a full-time position. 😂
Comments