What Is a WordPress Menu?
A WordPress “menu” is a feature that lets you organize links to pages, categories, and other content on your site and display them in any order you like.
For example, menus can be used for navigation like this at the top of your site.

Menus are not limited to pages.
- Pages
- Posts
- Categories
- Custom Links
You can combine these items to create a menu that suits your site.
Once you create a menu, you can also assign it to multiple display locations provided by your theme.
In this guide, we will create one menu and use it as a header menu on desktop and as a slide-in menu on mobile devices.
Create a New Menu
Create a menu from the WordPress dashboard.
Open “Appearance” “Menus”
If you have not created a menu yet, the screen for creating a new menu will be displayed.
If another menu already exists, click “Create a new menu.”
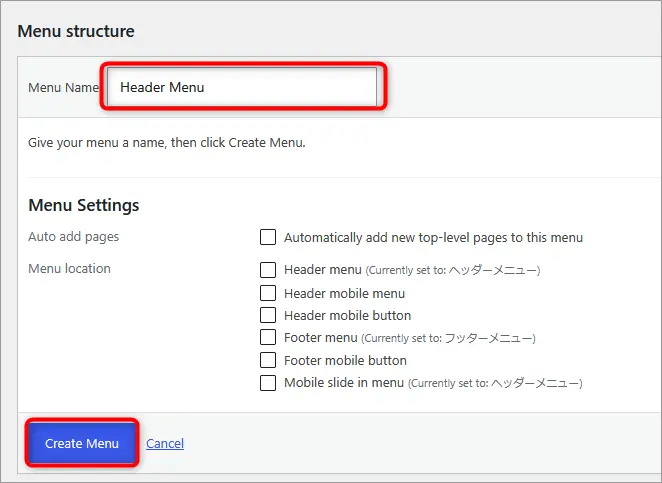
- Enter an easy-to-recognize name in “Menu Name.” For this example, we will use a name such as “Header Menu” so it is easy to identify in the dashboard.
- Click “Create Menu.”
Add Items to the Menu
After creating the menu, add the items you want to display on your site.
On the left side of the screen, you will see options such as Pages, Posts, Custom Links, and Categories.
Add Pages
If you want to add pages such as “Home,” “Contact,” or “Profile” to the menu, add them from “Pages.”
- Open “Pages.”
- Select “View All” if necessary.
- Check the pages you want to add to the menu.
- Click “Add to Menu.”
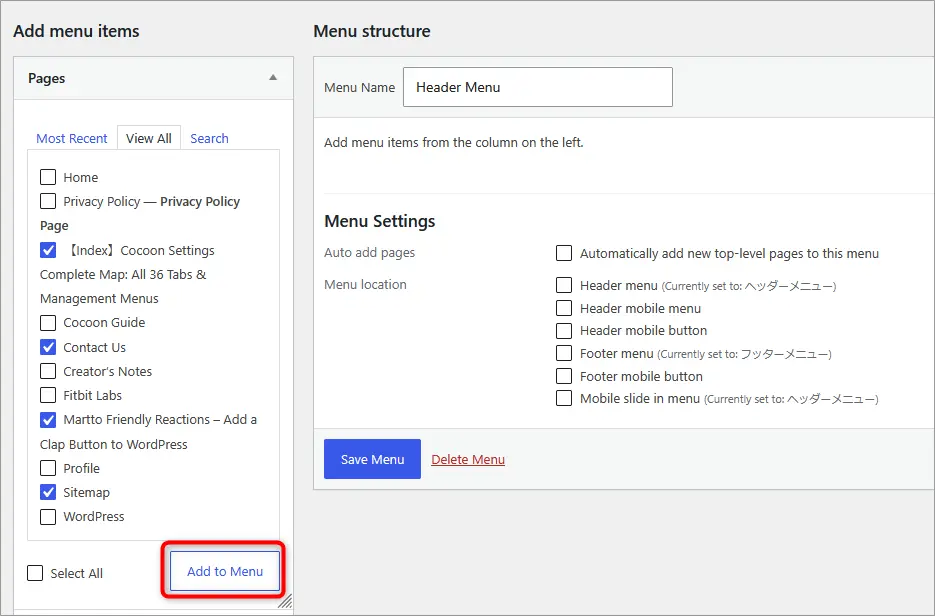
The pages you add will appear under “Menu Structure” on the right.
You can add Categories and Custom Links in the same way.
Rearrange the Menu Items
You can drag and drop menu items to arrange them in any order you like.
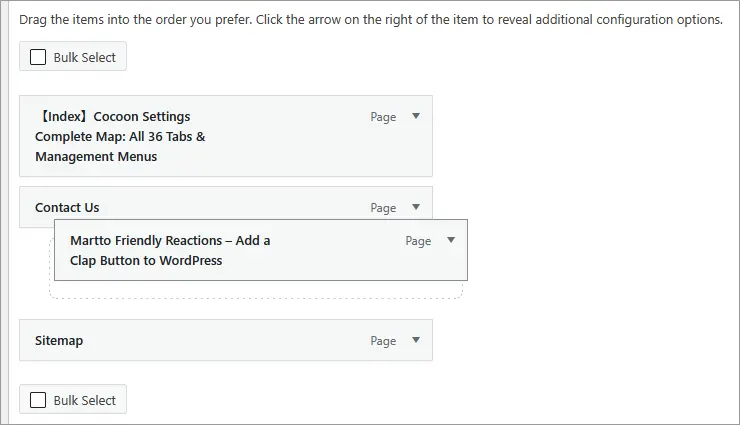
Arrange the items in the order you want them to appear on your site.
When you are finished, click “Save Menu.”
Choose Where to Display the Menu
Creating a menu alone does not automatically display it on your site.
You also need to specify where the menu should appear.
In Cocoon, you can choose the display location under “Menu Settings” at the bottom of the menu editing screen.
To display the menu at the top of the site on desktop, check “Header Menu.”
Under Menu Settings, there is also an option called “Automatically add new top-level pages to this menu.” If you enable it, newly created pages will automatically be added to the menu. If you prefer to manage the menu yourself, you can normally leave this option unchecked.
After completing the settings, click “Save Menu.”
The menu you created will now appear in the desktop header.
Display the Same Menu on Mobile Devices
Cocoon also lets you use the same menu you just created on mobile devices.
This time, we will display it as a “Mobile Slide-in Menu” that opens from the side of the screen.
Go back to “Menu Settings” on the menu editing screen.
Under “Display location,” check both:
- Header Menu
- Mobile Slide-in Menu
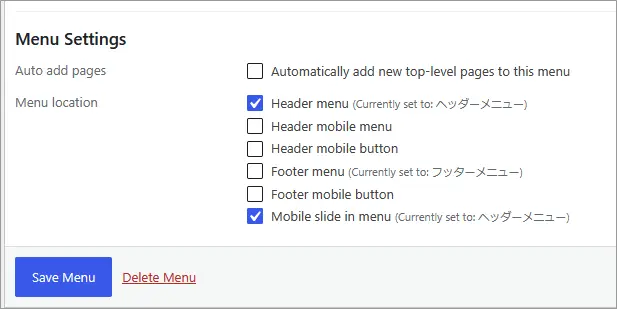
Click “Save Menu.”
Now, you can use the same menu on both desktop and mobile devices.
When you open the menu button on a smartphone, the items you configured will appear in the slide-in menu.
Start with One Simple Menu
Once you learn the basics of creating WordPress menus, you can use them in many different places on your site.
In this guide, we covered the following steps:
- Create a new menu
- Add pages, categories, custom links, and other items
- Rearrange the menu items
- Assign the menu to Cocoon’s Header Menu location
- Assign the same menu to the Mobile Slide-in Menu location
When you are getting started, a simple menu with just a few frequently used pages is more than enough.
WordPress menus can also be used in areas such as the sidebar and footer, not only in the header.
You can expand their usefulness even further by creating hierarchical menus or using Cocoon’s Box Menu feature.
For more information about using Box Menus, see the article below.

Comments