- What is Microsoft Clarity? Free Analytics Tool Explained
- Step 1: Sign Up for Microsoft Clarity and Get Your Project ID
- Step 2: Connect Clarity to Cocoon WordPress Theme via Settings
- Bonus Setup: Link Microsoft Clarity with Google Analytics 4 (GA4)
- How to Block Admin IP from Microsoft Clarity Tracking
- The History and Evolution of Microsoft Clarity
- Conclusion: Supercharge Your Blog with Microsoft Clarity
What is Microsoft Clarity? Free Analytics Tool Explained
“Microsoft Clarity” is a completely free website analytics tool provided by Microsoft.
While Google Analytics 4 (GA4) analyzes numbers like “traffic” and “traffic sources,” Clarity visually shows you “reader behavior.” If you are a beginner, you will definitely love these two incredible features:
- Session Recordings: You can watch video replays of your readers’ actual movements, such as mouse tracking, scrolling, and clicks, as if you were looking over their shoulders.
- Heatmaps: This feature shows reader interest at a glance using color gradients—for example, “red” for highly read areas and “blue” for ignored parts.
The most shocking benefit is that despite being so highly functional, it is completely free to use with no page view (PV) limits. It is an absolute must-have tool for your website!
Step 1: Sign Up for Microsoft Clarity and Get Your Project ID
First, let’s create a Microsoft Clarity account and get the “Project ID” needed to link it with your blog.
- Access the Microsoft Clarity official website and click “Sign up”.
- Choose your preferred account (Microsoft, Facebook, or Google) to sign in.
- When the “Create a new project” screen appears, enter your website’s “Name” and “Website URL,” and select an option from the “Site category” dropdown. *If there’s no exact match, just choose “Other”!
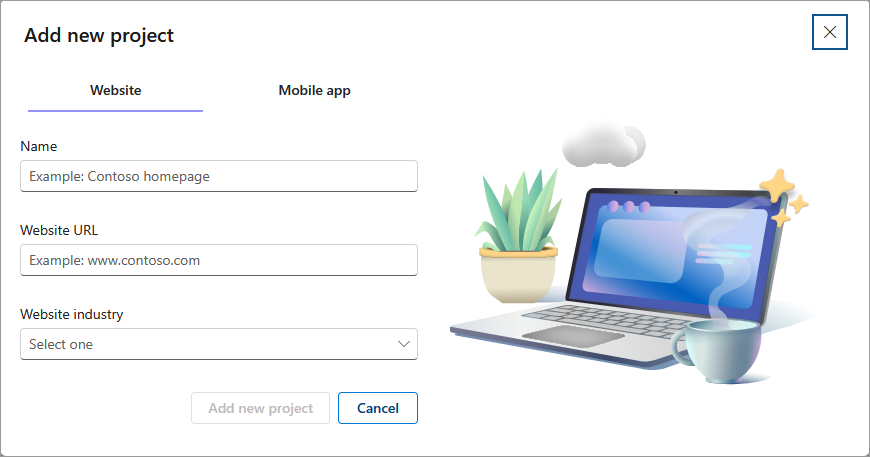
- Once filled out, click “Add new project”.
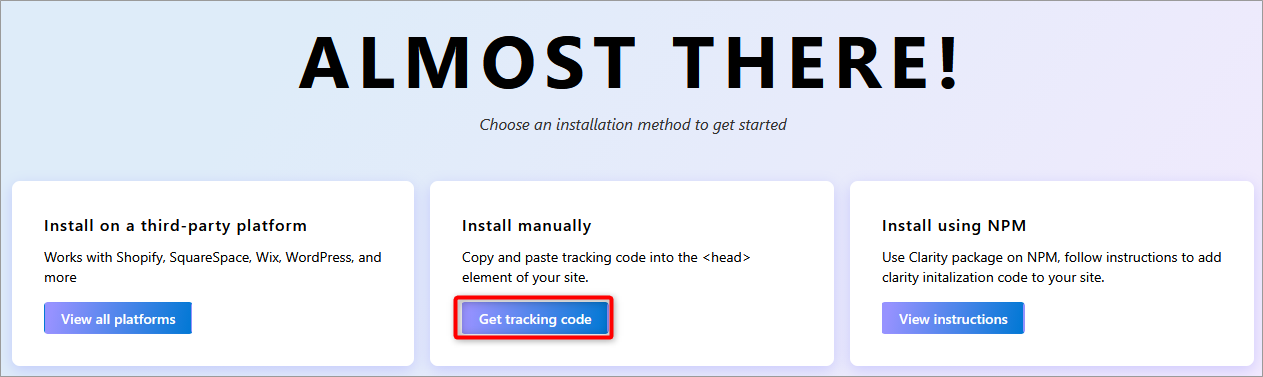
- Click the “Get tracking code” button in the center.
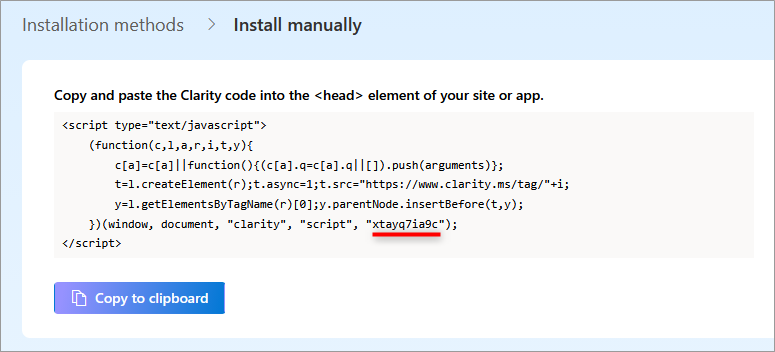
- Copy the Project ID (the text enclosed in ” ” at the very end) displayed on the settings screen.
Step 2: Connect Clarity to Cocoon WordPress Theme via Settings
This is where the Cocoon theme truly shines!
Normally, you would need to install a dedicated plugin or paste complex code into your site’s header, but with Cocoon, it is as easy as copy and paste.
- Open “Cocoon Settings (Cocoon 設定)” from your WordPress dashboard.
- Click the “Access Analytics & Authentication (アクセス解析・認証)” tab from the top menu.
- Scroll down the screen and paste the “Project ID (string)” you copied earlier into the blank field under “Clarity settings”.
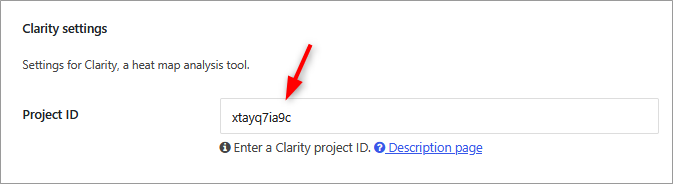
- Click the “Save all changes (変更をまとめて保存)” button at the bottom, and you’re done!
Bonus Setup: Link Microsoft Clarity with Google Analytics 4 (GA4)
Once you have connected Clarity to Cocoon, you should definitely link it with GA4. In fact, you can easily combine them right from the Clarity dashboard!
Why Link with GA4? (Amazing Benefits)
By linking them, the “numerical data” from GA4 and the “video data” from Clarity will be tightly integrated behind the scenes.
For example, if you are looking at your GA4 dashboard and wonder, “Why is the click rate for this article so high lately?”, you can use that data to pinpoint and replay the actual movements (videos) of the readers who made those clicks on the Clarity side!
This enables the ultimate analysis: noticing anomalies through numbers (GA4) and uncovering the readers’ true intentions through visuals (Clarity).
How to Link GA4 and Clarity
- Open your Microsoft Clarity dashboard.
- Click the “Settings” (gear icon) in the top right corner of the screen.
- Select “Setup” or “Integrations” from the left menu.
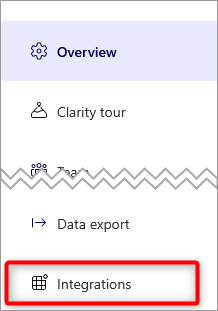
- Click the “Google Analytics” button displayed on the screen.
- Click “Get started” on the Google Analytics integration screen.
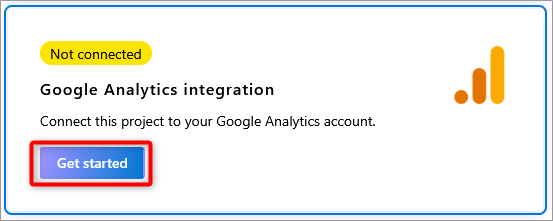
- A Google account authentication screen will appear. Select the account managing your blog’s GA4 and click “Allow”. On the following screen, check “Select all” and click “Continue”.
- Select your blog’s “GA4 Property” that you want to link, save it, and you’re finished!
How to Block Admin IP from Microsoft Clarity Tracking
If left as is, your own browsing as the administrator will also be tracked. If necessary, let’s block it using your IP address.
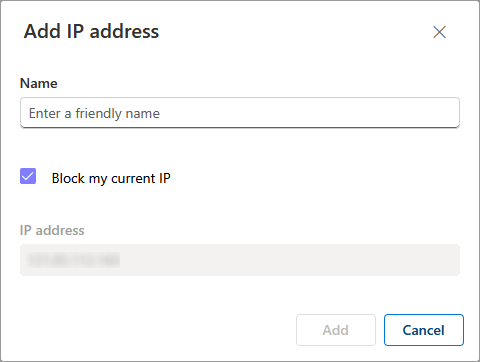
- Select “IP blocking” from the left menu. Then, click “+ Block IP address” on the next screen.
- Give it an easily recognizable name, check the “Block my current IP” box, and click the “Add” button.
The History and Evolution of Microsoft Clarity
You might be wondering, “Why is it completely free despite being so high-functioning with no PV limits?” Let me briefly introduce the background of how Clarity was born and its history of updates.
2020: Born from Website Owners’ Struggles
Microsoft Clarity was officially released to the public in October 2020.
At that time, heatmap analysis tools already existed, but they faced major issues such as “high-functioning ones are expensive” and “installing them drastically slows down the blog’s loading speed.”
So, Microsoft stood up with the goal to “create a revolutionary tool that anyone can use for free, without negatively affecting site performance!” Thus, Clarity was born—featuring an incredible condition of being completely free, alongside a system that processes complex data on Microsoft’s powerful servers to prevent slowing down your site.
Notable Updates in Clarity’s Evolution
Even after its release, Clarity continues to evolve without stopping. Let me pick up a few major updates that are great news for blog operators.
- Integration with Google Analytics (GA4): You can now connect GA4’s numerical data with Clarity’s visual data for deeper analysis.
- Auto-summarization powered by Copilot (AI): Amazingly, AI now analyzes the recorded reader movements and provides text summaries like, “This reader is confused and cannot find the button.”
- Smart Events introduction: It now automatically detects and alerts you to things like “Rage clicks,” where a frustrated reader clicks the screen repeatedly.
Because it is backed by a tech giant like Microsoft, the latest technologies, including AI, are constantly being added. There is no reason not to use it to grow your blog!
Conclusion: Supercharge Your Blog with Microsoft Clarity
In this article, we explained how to connect Microsoft Clarity to the free WordPress theme “Cocoon” without using any plugins.
Cocoon is truly an outstanding theme, allowing you to set this up so easily with just its standard features! You also don’t have to worry about your site slowing down due to adding more plugins.
Now your blog is equipped with the ultimate security camera! Be sure to peek into the actual movements of your readers and use it to improve your blog.
![[For Beginners] How to Add a Popular Posts Carousel in Cocoon (Free WordPress Theme) Without Plugins](https://martto.net/en/wp-content/uploads/2026/07/carousel_en.png "[For Beginners] How to Add a Popular Posts Carousel in Cocoon (Free WordPress Theme) Without Plugins")
Comments