How to Ensure the Security of Emails Sent from WordPress
When running a WordPress site, ensuring the “reliability and security” of emails sent from your system—such as automated replies from contact forms and comment notifications—is crucial. Especially since the strict update to Google and Yahoo’s “Email Sender Guidelines” in 2024, emails without proper authentication settings not only fail to deliver but also pose a significant risk of damaging your domain’s reputation.
In this article, instead of relying on external paid systems, we will guide you through the exact steps to utilize the SMTP functionality of your own rental server. We will explain in an easy-to-understand way for beginners how to successfully clear the highest standard of security authentication (DKIM and DMARC).
The screenshots in this guide are from the Japanese management screens of Core Server and Value Domain. However, the step-by-step numbers, input fields, and plugin settings are identical worldwide. Just follow the red numbers and highlighted areas to complete your setup easily!
Building a 100% Secure Email Delivery Environment with WP Mail SMTP
The definitive solution to make emails sent from WordPress as secure and reliably delivered as possible is to activate the “WP Mail SMTP” plugin, “configure your server’s SMTP settings, and correctly set up the DKIM and DMARC DNS records on your domain side.” This might sound difficult for beginners, but you will be absolutely fine if you follow the steps!
In this guide, I will use Core Server, which I personally use, as an example. However, every rental server always provides an official manual. If you would like to see specific explanations with screens tailored to your host, please check your own server’s documentation alongside this guide.
Step 1: Get the “DKIM Setting” Values from Core Server
First, we will retrieve the encrypted text for “DKIM (Public Key),” which acts as the digital signature for your emails, from the Core Server side.
- Log in to your Core Server (V2) control panel.
- Select 1 “Mail” (メール) from the left menu.
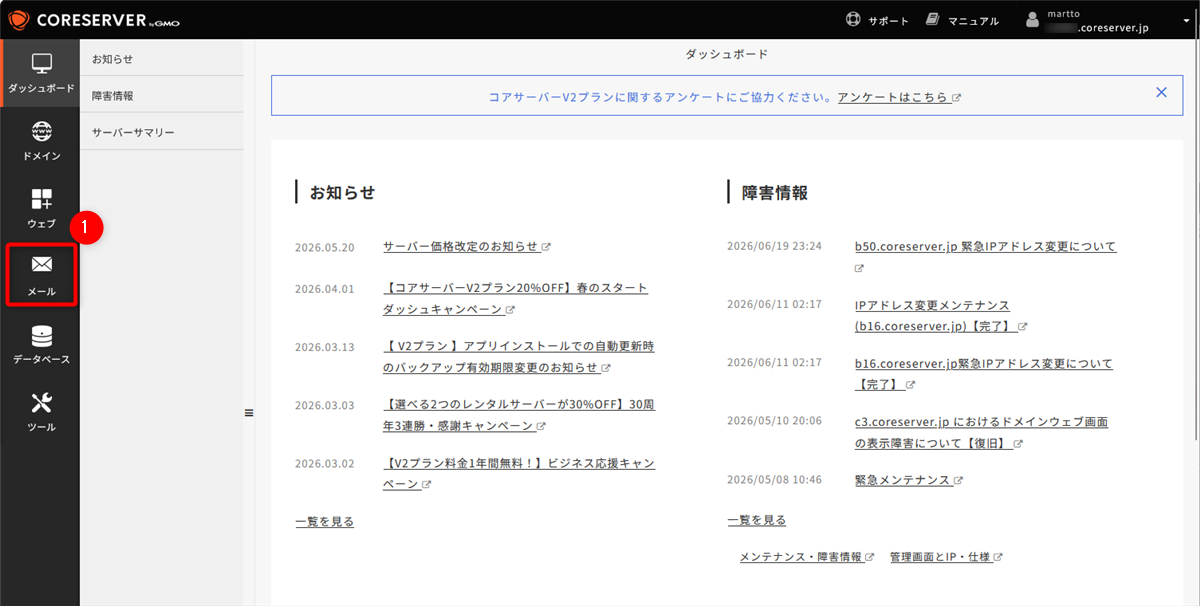
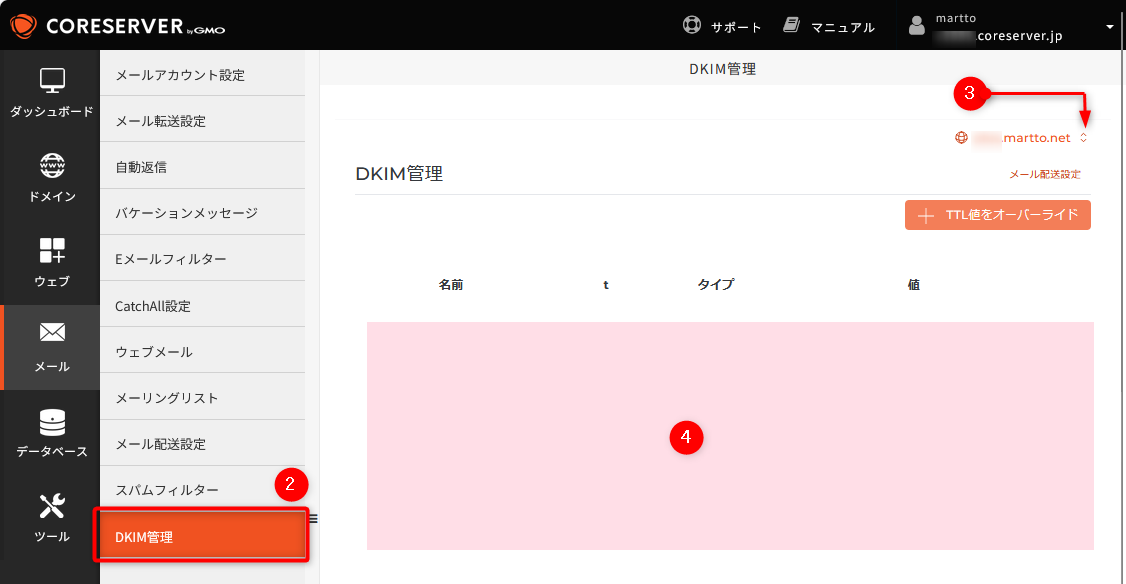
- Select 2 “DKIM Management” (DKIM管理) and choose the target domain in 3 (Note: Even if you have created subdomains, you must select the root parent domain). If nothing is written in the section marked 4, DKIM has not been activated yet. (*If it is already filled in, please skip to Step 6.)
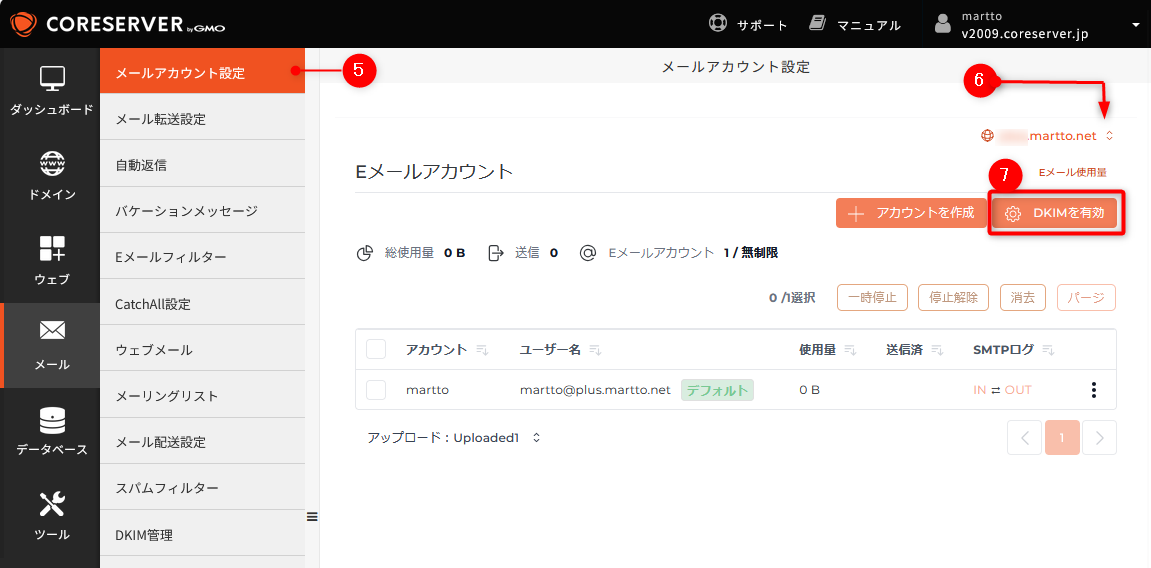
- Select 5 “Mail Account Settings” (メールアカウント設定). Choose the target domain in 6. Click 7 “Enable DKIM” (DKIMを有効).
- It is successful if “Success” appears in the bottom right of the screen.
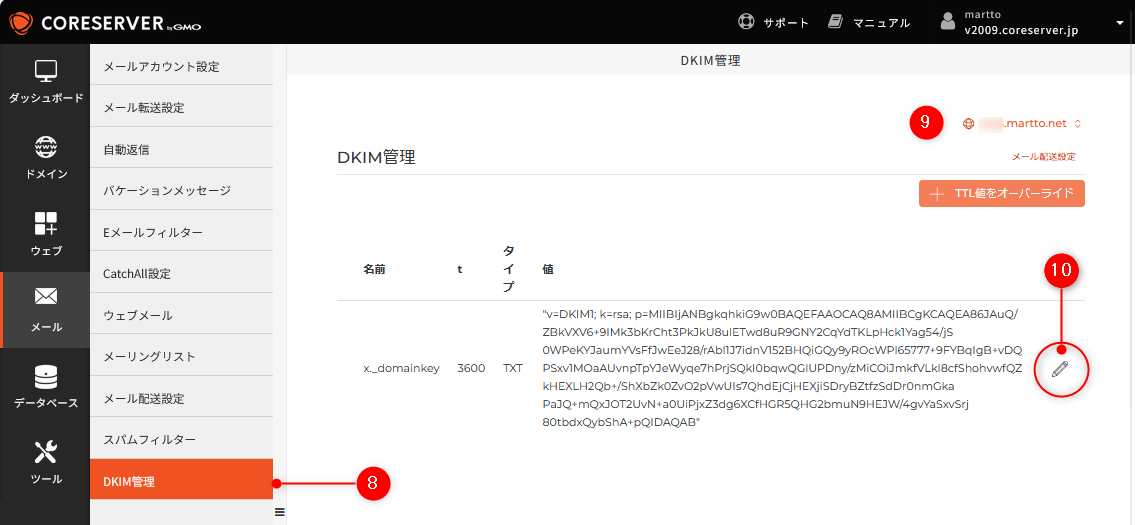
- Select 8 “DKIM Management” (DKIM管理). Confirm the target domain in 9. Click 10 the pencil (Edit) icon.
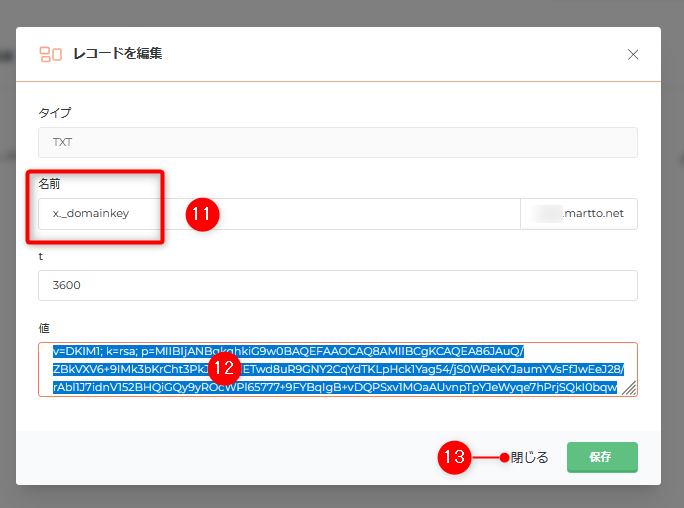
- Copy the text entered in 11 “Name” (名前) and the DKIM record entered in 12 “Value” (値) separately, and save them in a text editor like Notepad. Close this screen by clicking 13.
Step 2: Add DNS Records for DKIM and DMARC in Value Domain
Next, we will apply the retrieved values to the DNS settings of Value Domain. This time, to ensure robust security, we will enable both DKIM and DMARC.
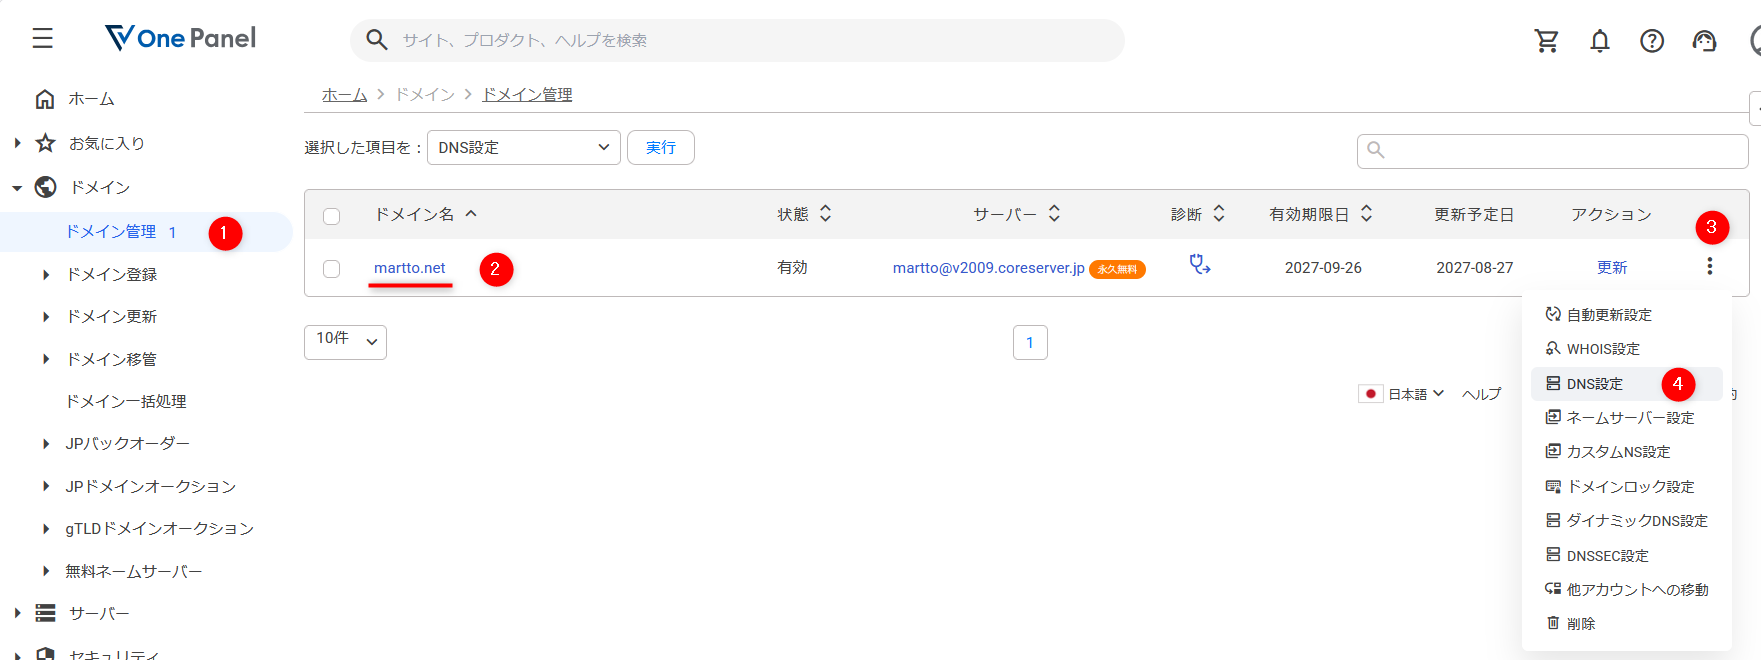
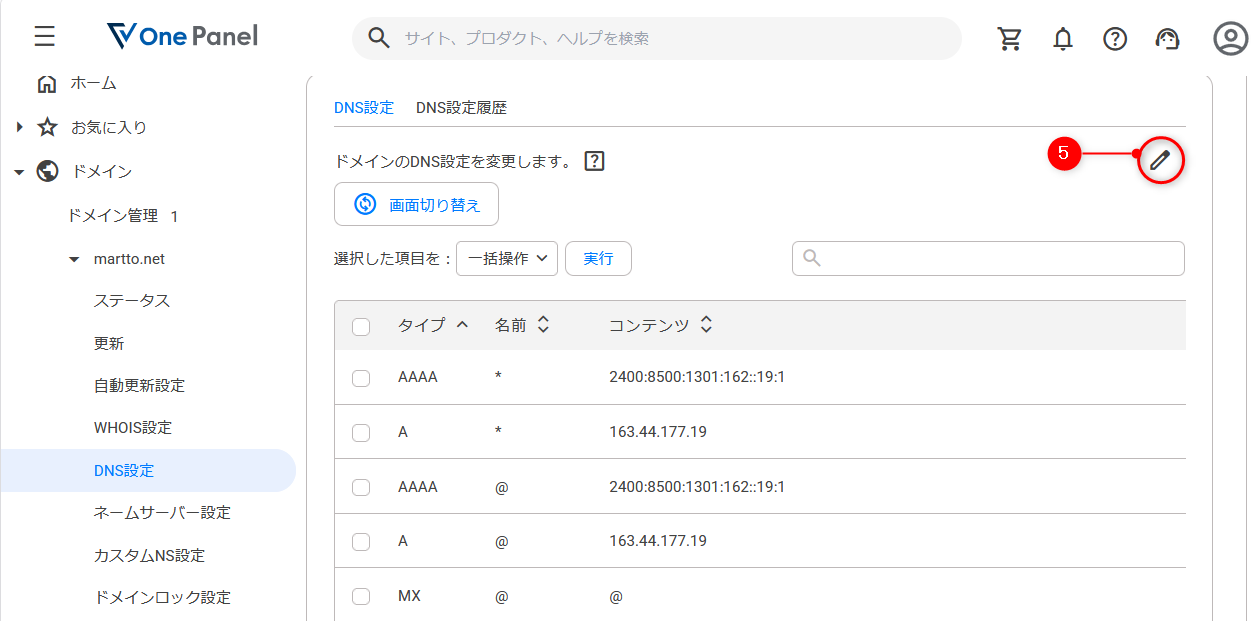
- Open 1 “Domain Management” (ドメイン管理) in Value Domain. Confirm the target domain in 2. Open the 3-dot menu on the right edge in 3. Click 4 “DNS Settings” (DNS設定).
- Click 5 the pencil (Edit) icon.
- Click 6 “Add Row” (行の追加). Click the “Type” (タイプ) column in 7 and select “TEXT”. Paste the “Name” (名前) you copied in Step 7 of Step 1 into 8. Paste the long “DKIM Record” into 9 “Content” (コンテンツ).
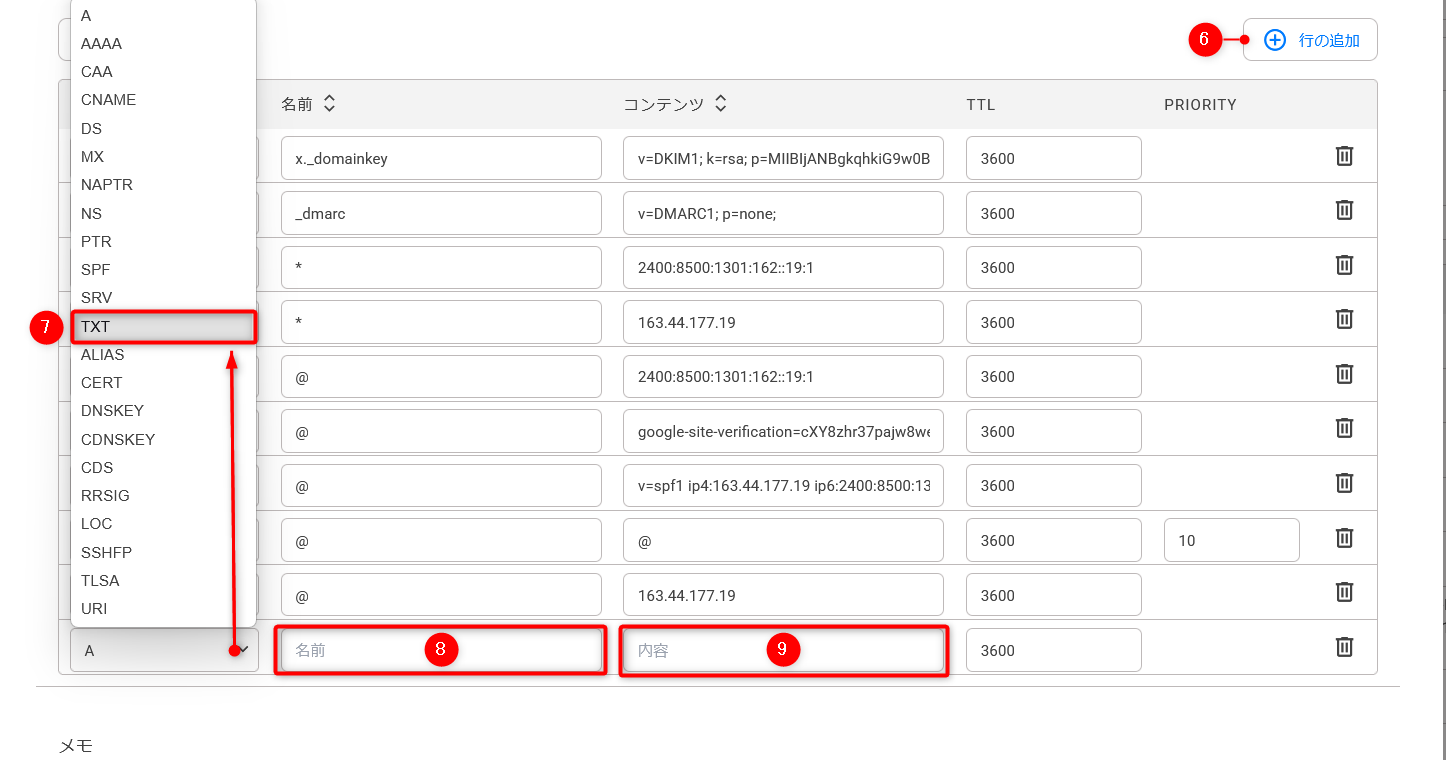
- Click “Add Row” (行の追加) once more. Following the same procedure, select “TEXT” for Type. Enter “_dmarc” for Name. Enter “v=DMARC1; p=none;” for Content. Click “Save” (保存) in the bottom right.
- If the two rows are successfully added like this, you are all set!

[Supplement] The Meaning of Each Record
- DKIM (x._domainkey): A security mechanism that applies a digital key (electronic signature) to your email, proving to the receiving side that the message is “authentic and has not been tampered with.”
- DMARC (_dmarc): An administrative policy rule that dictates how to handle “suspicious spoofed emails” that fail SPF or DKIM authentication. Setting
p=none;specifies a safe monitoring mode that means “do not reject emails for now, just monitor them and send reports to the administrator.”
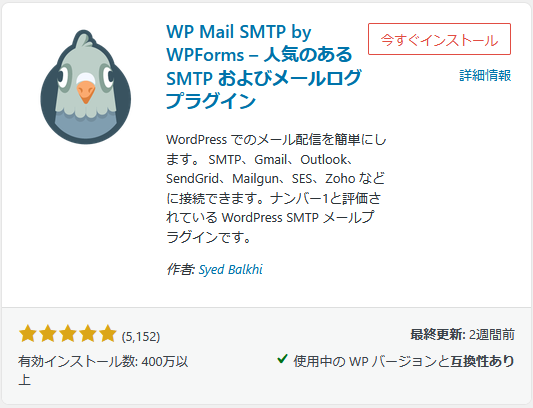
Step 3: Configure “WP Mail SMTP” in Your WordPress Dashboard
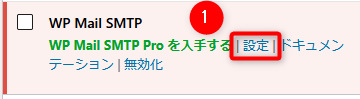
- Once activated, open the plugin’s “Settings” in 1.
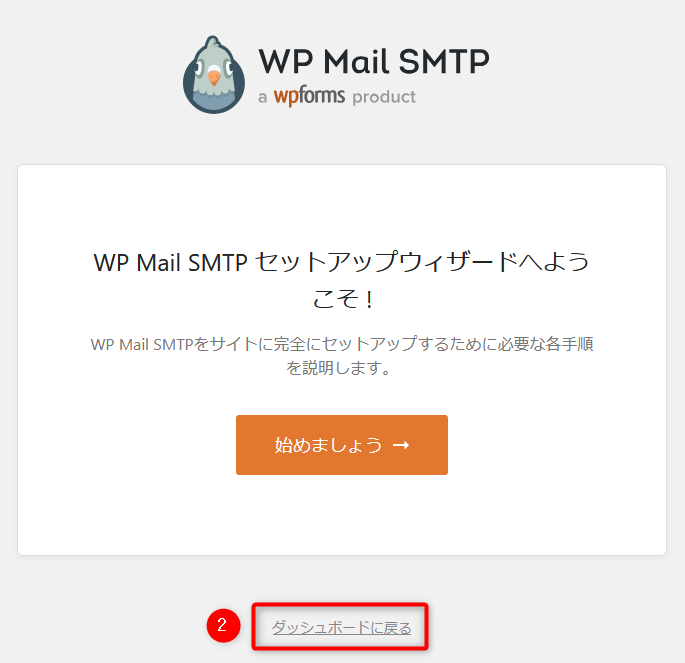
- If the setup wizard launches in 2, let’s temporarily return to the dashboard.
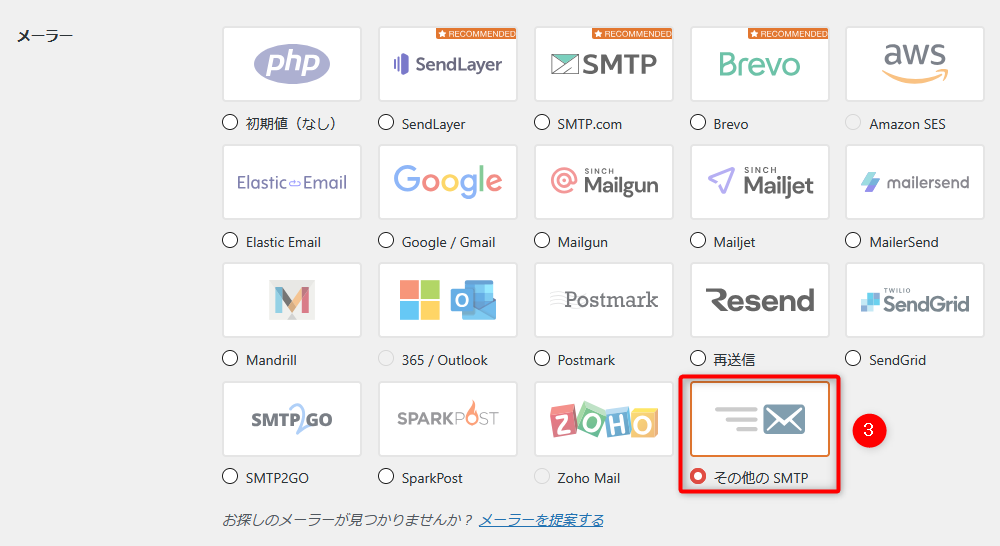
- Select “Other SMTP” from the mailer list in 3.
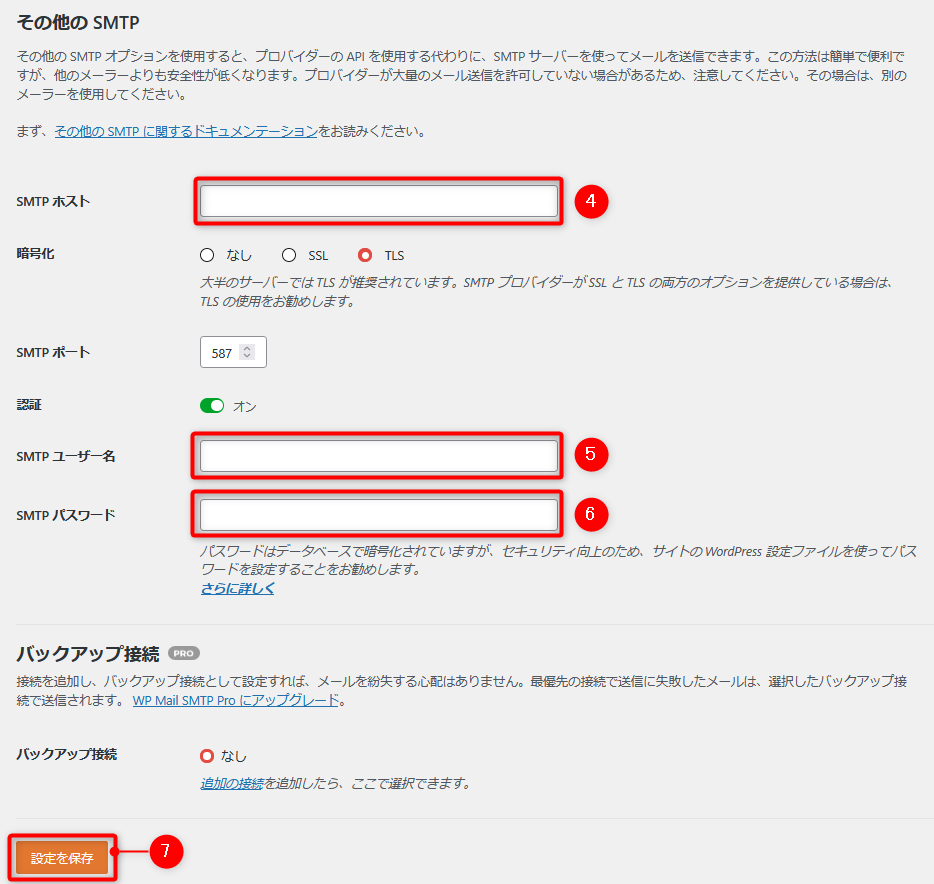
- Fill in the fields as follows:
4 SMTP Host: Enter your server’s “Outgoing Mail Server (SMTP Server Name)”.
5 SMTP Username: Enter the exact “Email Address” you use for your blog.
6 SMTP Password: Enter the “Password” configured for that email address.
Click 7 “Save Settings”.
Step 4: Run an Email Test to Verify SPF, DKIM, and DMARC
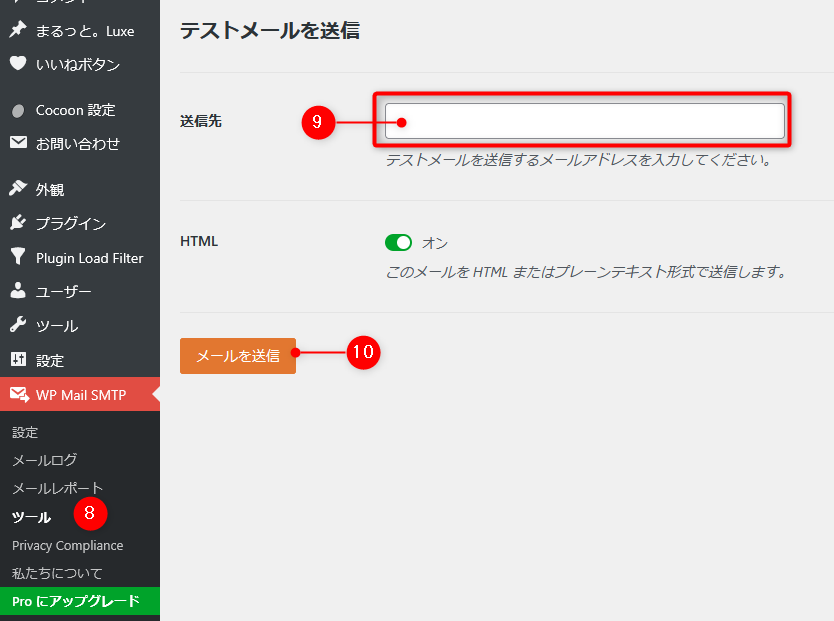
- Click “Tools” from the left menu in 8. Enter your personal Gmail address in 9. Click 10 “Send Email”.
- Open the received test email in Gmail and click the 3-dot menu in the upper right corner in 11. Click 12 “Show original”.
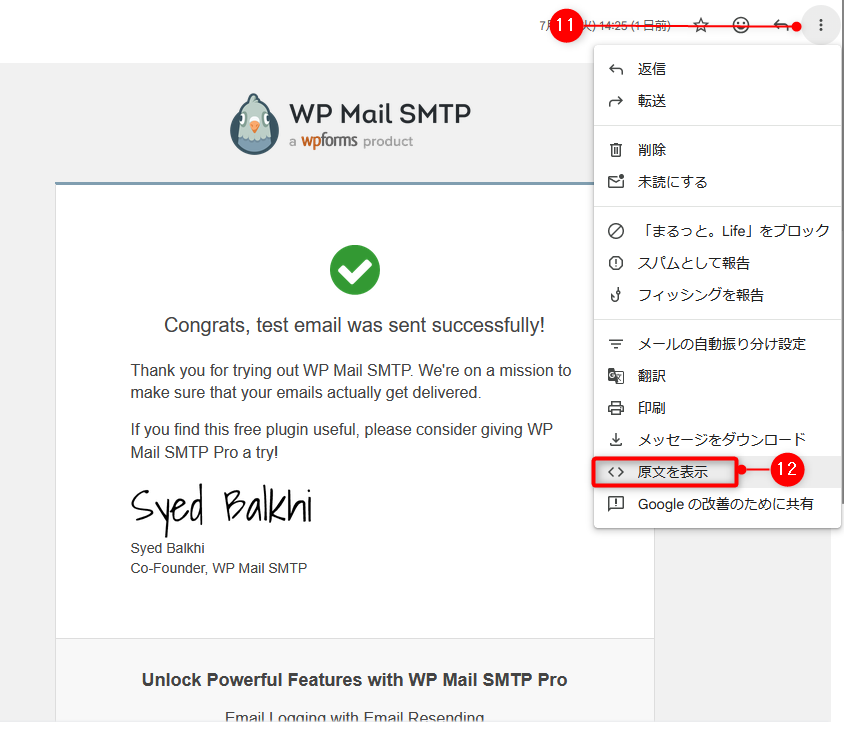
- Finally, let’s verify if the authentication settings are successful!
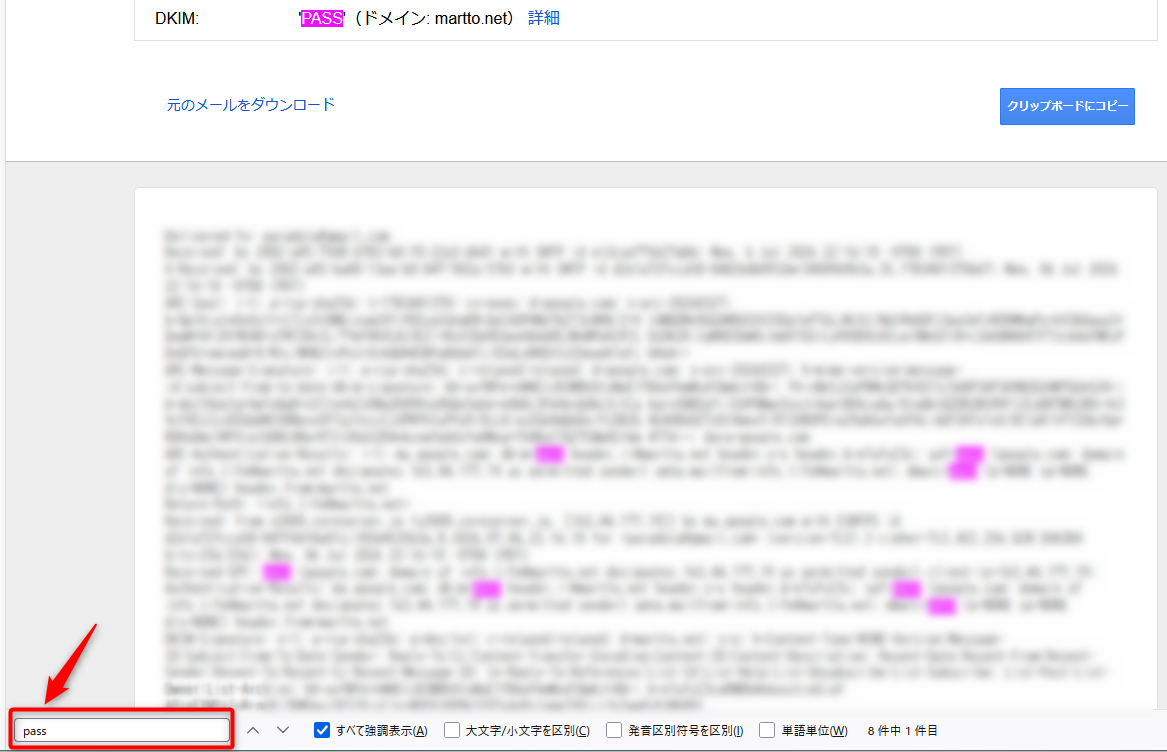
The wall of English text might look overwhelming, but here is a super simple trick.
Open your browser’s search function (Ctrl + F on Windows, Cmd + F on Mac) and type “pass” into the search box (indicated by the arrow in the bottom left). As shown in the image, if the word “pass” is highlighted and glowing across all three categories (DKIM, SPF, DMARC), it is a 100% perfect success!
Your blog’s email security is now configured to the safest possible standard worldwide!If you still feel uneasy looking at it yourself, copy the highlighted section of the header, paste it into a chat with Gemini, and ask, “Please evaluate this email header.” Your uncertainty will surely turn into absolute confidence!
Why Core Server Users Absolutely Need DKIM and DMARC Authentication Now
Due to the massive updates to email sender guidelines implemented by Google in 2024, major email providers like Gmail now strictly restrict or block emails from domains with insufficient anti-spoofing measures. This is exactly why automated form replies and comment notifications fail to deliver even on personal blogs.
The security gained by configuring these DNS records is not just about making sure your emails arrive. By establishing these rules, servers around the globe can monitor
⚠️ Crucial Warning: Before you blindly choose an external email service just for convenience, make sure to read my raw trouble report below. You’ll see why free plans can suddenly turn into a nightmare during site migration:

![[No Plugin Required] How to Safely Protect and Manage Your WordPress Login ID](https://martto.net/en/wp-content/uploads/2026/06/WordPress_id_en.png "[No Plugin Required] How to Safely Protect and Manage Your WordPress Login ID")

Comments