Generating and submitting an XML Sitemap is essential for quickly and accurately communicating your entire site structure to search engines like Google. Here is a clear, step-by-step guide optimized for the 2026 web landscape.
By introducing just one reliable plugin, you can set up an automated system that notifies Google every time you publish or update an article.
XML Sitemap & Google News Plugin vs. Legacy XML Sitemap Plugins
🔎 When searching for sitemap plugins in WordPress, you will see tools with similar names, such as XML Sitemap & Google News and XML Sitemap Generator for Google. You might wonder which one you should choose.
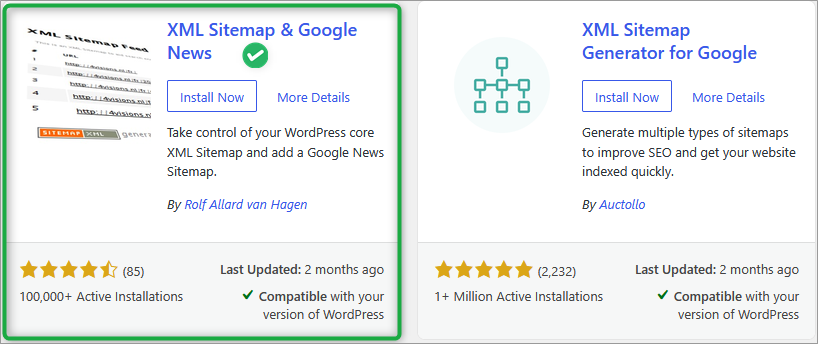
On the search screen, “XML Sitemap Generator for Google” (formerly Google XML Sitemaps) shows a massive number of active installs. However, this high number is simply due to the track record built up over more than a decade.
While it was once the standard plugin, major bugs and security vulnerabilities emerged around 2022, causing recommended practices to shift significantly.
Therefore, the best choice in 2026 is XML Sitemap & Google News. It is an outstanding plugin that I can confidently recommend to beginners for its easy setup, stable operation, and strong security.
XML Sitemap & Google News Initial Setup Guide
First, let’s go through the steps to install the plugin and automatically generate your sitemaps.
- Search and Add New Plugin
Go to Plugins > Add New Plugin in your admin dashboard, and enter “XML Sitemap & Google News” into the search bar. - Install and Activate
When the plugin appears, click Install Now, then click Activate once installation completes, and open the plugin settings. - Select Content to Include
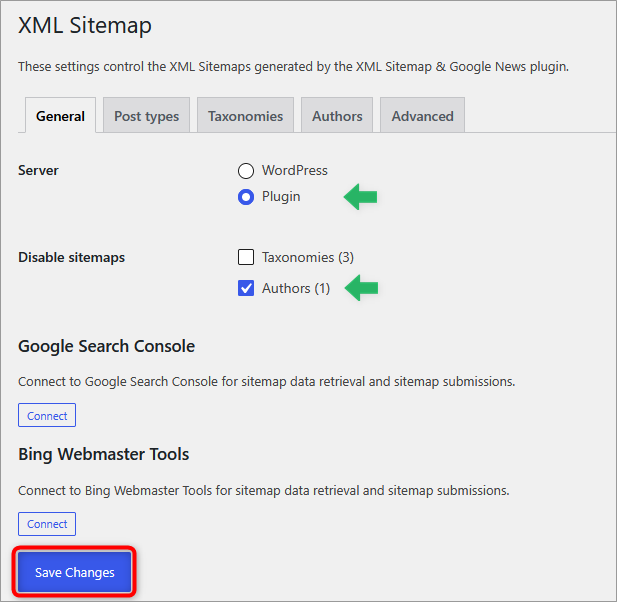
- 【Sitemaps】 ➔ Check Plugin (Reason: Choosing “Plugin” allows detailed, SEO-friendly fine-tuning such as “excluding specific pages” and “accurately reflecting the last modified date”).
- 【Disable sitemaps】 ➔ Check Authors (Reason: If you run a blog alone, author pages can easily create duplicate content with your post list).
- 【General】Check all options.
- 【Posts】 □ Update the Last Modified date on each new comment. (Leave unchecked)
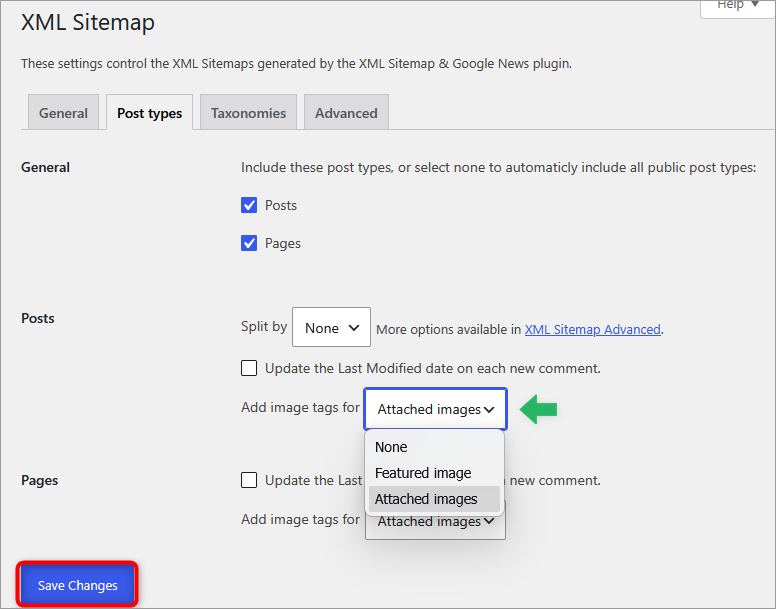
- 【Taxonomies】Check everything except Formats.
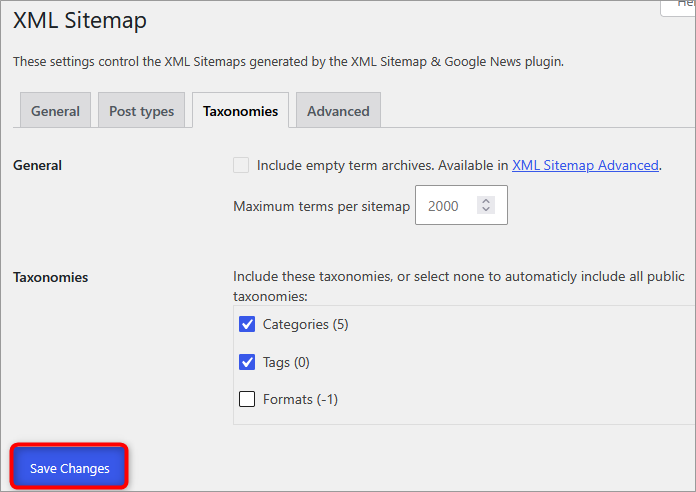
- Leave settings unchanged.
Google Search Console Integration Guide
To help Google discover your generated sitemap, connect your site with Google Search Console (verify ownership).
- First-time Google Search Console users ➔ Access Google Search Console and click Start now.
- After signing in ➔ Click Add property.
There are two registration methods in Search Console: Domain and URL prefix.
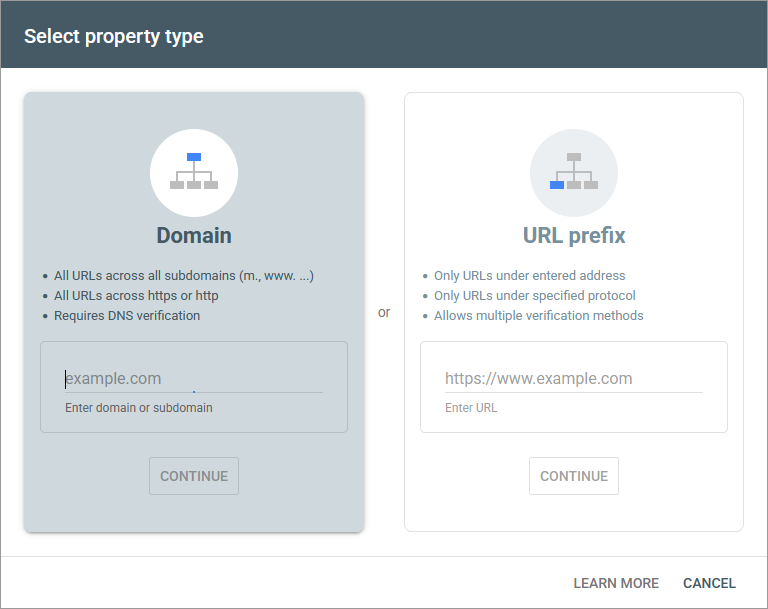
Which one should you choose?
- 【Domain (DNS Settings)】👑 Recommended!
Recommended if you plan to run subdomains or want to manage your entire site at once. Requires DNS configuration for your domain.- 【URL Prefix】
If you feel DNS configuration on your server is too complicated, or if you simply want to manage a single blog, this method is very easy because you can complete it by pasting code into Cocoon Settings.
Choose either of the procedures below based on your preference to complete the integration.
- Method A: Domain Registration Steps (DNS Settings)
-
- Add Property
Open Google Search Console, enter your domain (e.g., example.com) in the Domain section on the left side of the Add Property screen, and click Continue. - Get TXT Record
Copy the TXT record (google-site-verification=…) displayed on the screen. Keep this screen open, and open the DNS settings page of your domain provider.
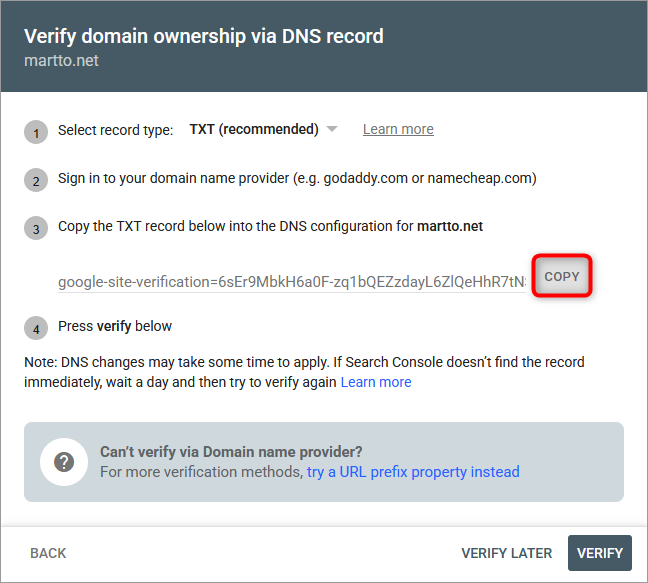
- Add Record to DNS Settings
Open the DNS settings management page of your domain registrar, and add the TXT record you copied.
* For detailed instructions with screenshots on Value Domain (CoreServer), see this guide (Step 2).- Type ➔ TXT
- Name ➔ @
- Content ➔ Paste copied content
- Verify Ownership
Return to Google Search Console and click Verify to complete authentication.
- Add Property
- Method B: URL Prefix Registration Steps (Cocoon Settings)
-
- Add Property
Open Google Search Console, enter your site URL (https://…) in the URL Prefix section on the right side of the Add Property screen, and click Continue. - Get Verification ID
Under Other verification methods, select HTML tag and copy the code (only the alphanumeric characters inside content=”…”).
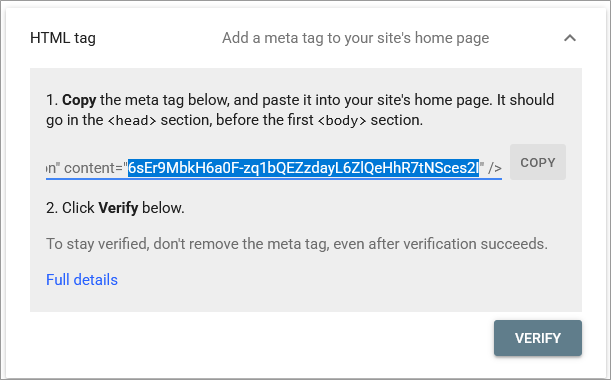
- 【Cocoon Method】Insert Code
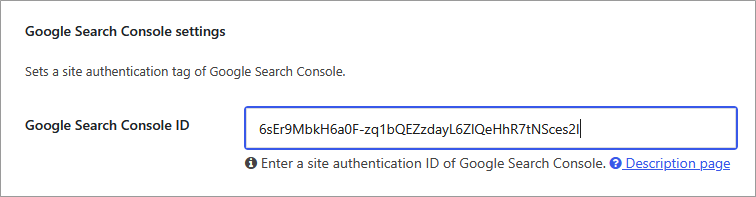
Go to Cocoon Settings ➔ Analytics & Verification in your WordPress admin area, paste the copied ID into the Google Search Console ID field, and save changes.
- Verify Ownership
Return to Google Search Console and click Verify to complete authentication.
- Add Property
How to Submit Your Sitemap in Search Console
Finally, notify Google of your sitemap location to complete the setup.
- Open Sitemaps Menu
Select Sitemaps from the left navigation menu in Google Search Console. - Enter URL and Submit
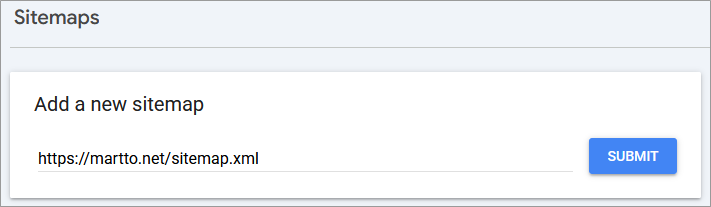
Under Add a new sitemap, type sitemap.xml after your registered URL and click Submit.
* If registered as a Domain property, the field is blank, so enter “sitemap.xml” after your domain name.
- Check Status
After submitting, if the status shows Success, your setup is complete.
Key Feature: What Is Google News Sitemap?
A major feature of XML Sitemap & Google News is its built-in Google News Sitemap generation feature.
This dedicated notification feature helps deliver your posts faster to Google News and Google Discover (recommended articles). It has three distinct advantages over standard sitemaps.
1. Detects Posts Published Within 48 Hours Only
While regular sitemaps include all articles on your site, Google News Sitemap automatically picks up only brand-new posts published within the last 48 hours.
By directly signaling your newest content to Google crawlers seeking fresh information, your indexing speed improves significantly.
2. Automatically Adds Google News Tags
The plugin automatically includes technical tags required for Google to recognize content correctly as news, including site name, language settings, exact publication timestamp, and article title.
3. Automatic Cleanup After 48 Hours
Once two days pass from publication, the plugin automatically removes the post from the news sitemap. You do not need manual maintenance, and your sitemap stays updated effortlessly.
This feature is highly recommended if you write articles where timeliness is essential, such as trending news or breaking product reviews. Setting up smooth paths for web crawlers will increase your exposure opportunities.
![[Beginner’s Guide] How to Set Up Cloudflare Turnstile for Contact Form 7](https://martto.net/en/wp-content/uploads/2026/07/Cloudflare-Turnstile_en.png "[Beginner’s Guide] How to Set Up Cloudflare Turnstile for Contact Form 7")
Comments