Difference Between Google Tag Manager (GTM) and GA4 Measurement ID
When you decide to start web analytics and do a quick search, you will almost always come across two terms: “GA4” and “GTM (Google Tag Manager)”.
Many beginners get confused and wonder, “Wait, do I have to set up both?” Let’s break down the difference between the two using a simple analogy.
Imagine for a moment that you run your own physical store!
-
- GA4 (Measurement ID): An “automatic counter” at the entrance that records the number of customers and their movements.
- GTM (Google Tag Manager): A “power strip (extension cord)” that connects and manages various devices and signs all at once.
For example, if you only want to connect the “automatic counter (GA4)” to the wall outlet in your store, you can just plug it directly into the wall, and it will work perfectly.
But what if your store grows, and you want to plug in the counter, a “pop-up electronic sale sign,” and a “LINE registration button” all at the same time?
One wall outlet won’t be enough. You’ll need to plug a “power strip (GTM)” into the wall to manage all the cords and power sources together.
In short, GA4 is the “measurement device itself,” while GTM is the “organizer box for managing multiple cords”!
Conclusion: Simply Paste the GA4 Measurement ID in WordPress Cocoon
To get straight to the point, if you run a personal blog or a small business website, there is absolutely no need to use a complex system like GTM (the power strip)!
Especially if you are using the WordPress theme Cocoon, the theme already has a built-in “wall outlet” (a dedicated input field) specifically for the “automatic counter (GA4)” right from the start.
Therefore, directly pasting the “GA4 Measurement ID” into Cocoon is the safest and most lightweight method, as it doesn’t involve any extra, unnecessary parts.
You might still find articles online explaining “how to set up analytics using GTM,” but those are based on outdated information from the old “UA (Universal Analytics)” era. You don’t need to be confused anymore!
Be confident and simply set up GA4 on its own.
2026 Guide: How to Set Up GA4 Web Analytics in Cocoon
Now, let’s look at the actual steps to set up GA4 in Cocoon.
It’s super easy, so let’s do it together!
Step 1: Copy Your “G-” Measurement ID from the GA4 Dashboard
First, open your Google Analytics (GA4) dashboard and find your website’s “Measurement ID”.
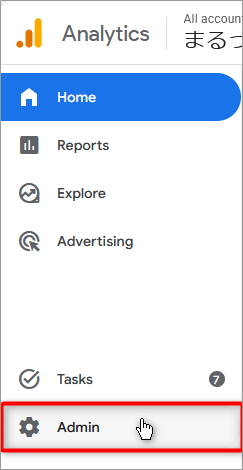
- Log in to Analytics, then click “Admin” at the very bottom of the left-hand menu.
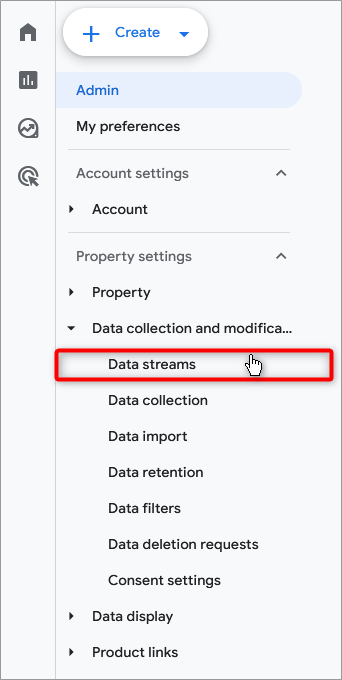
- Click on “Data streams”.
- Click on the account for which you want to get the Measurement ID.

- Copy the Measurement ID starting with “G-” located on the right side.

Step 2: Open the “Access Analytics / Authentication” Tab in Cocoon Settings
Next, return to your WordPress dashboard and open “Cocoon Settings” (Cocoon設定) from the left menu.
From the tabs lined up at the top, click on the “Access Analytics / Authentication” (アクセス解析・認証) tab.
Scroll down a bit until you find the “Google Analytics Settings” section.
This is the most crucial point!
- Google Tag Manager Settings: Leave this completely blank.
- GA4 Measurement ID: Paste the “G-” ID you copied earlier right here.
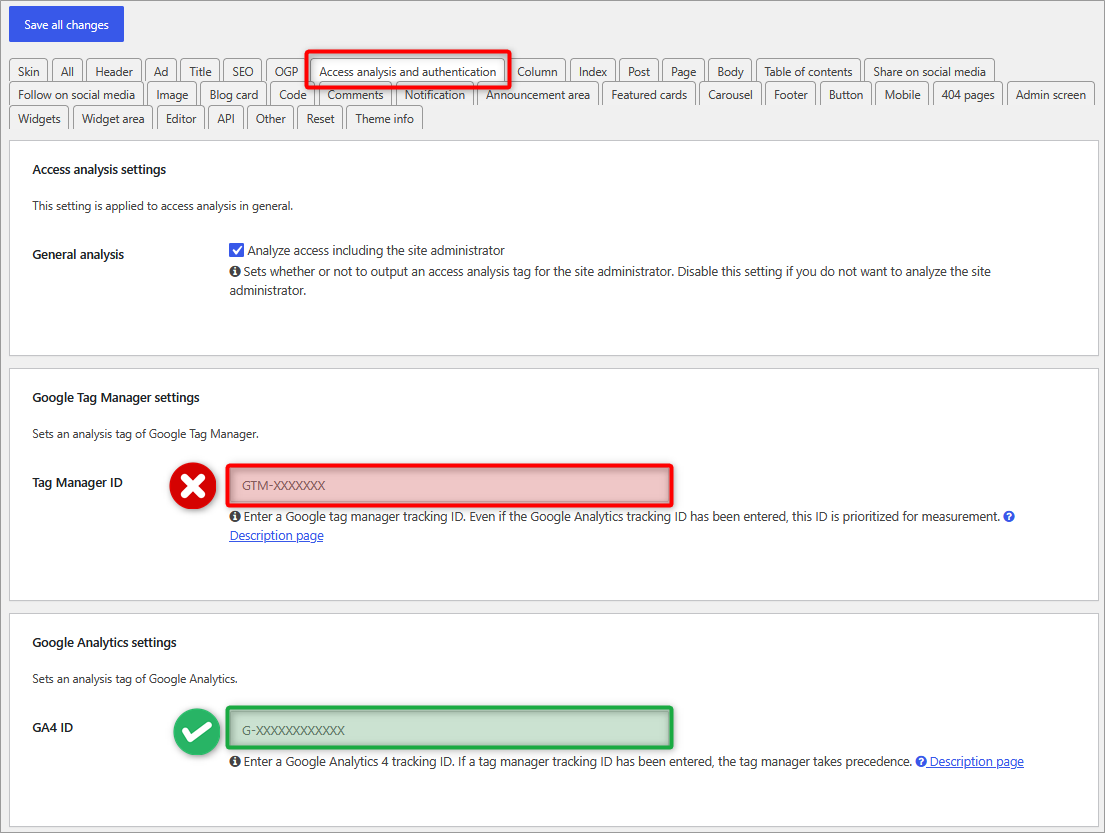
Be careful not to enter it in the GTM field by mistake, as this could cause data to be tracked twice and lead to errors later on!
Finally, don’t forget to click the “Save all changes” button at the very bottom, and your setup is complete!
The Evolution of Google Analytics Leading to GA4
In this guide, we covered the differences between “GTM” and “GA4,” as well as the correct setup method for Cocoon.
But why do we use GA4 now? Let’s take a quick look at the history of Google Analytics!
Over the past 20 years, Google Analytics has been reborn four major times to keep up with the rapid evolution of the internet, such as the rise of smartphones and stricter security rules.
History of Google Analytics Versions
- 1st Generation: Google Analytics (Version 1)
[Started] November 2005
[Features] Born when Google acquired a famous analytics software called “Urchin.” This was the origin, where you simply pasted an early JavaScript (urchin.js) into your code. - 2nd Generation: Classic Google Analytics (Version 2)
[Started] 2007
[Features] The design and dashboard were completely renewed, and e-commerce tracking (online sales) became highly detailed. Midway through (2009), a revolutionary system (asynchronous tags) was introduced so tracking wouldn’t slow down a website’s loading speed. - 3rd Generation: Universal Analytics (UA: Version 3)
[Started] 2013 (Beta from 2012)
[Features] The incredibly famous version used by blogs and websites worldwide. The world-class free Japanese WordPress theme “Cocoon” was born during this era in 2018. At that time, this 3rd generation (UA) was at its absolute peak. Because of this, many Cocoon setup tutorials still floating around the internet (written around 2018-2019) are based on this older 3rd generation. - 4th Generation: Google Analytics 4 (GA4: Version 4)
[Started] October 2020 (Beta from 2019)
[Features] The current latest version, which can track both smartphone “Apps” and “Websites” simultaneously. Along with this update, the 3rd generation (UA) officially retired and completely stopped collecting data after a multi-year transition period.
The internet world will continue to change at a rapid pace, but the most important thing is to “choose the simplest and most lightweight method that fits the current era.” Let’s take a safe and secure first step for your wonderful blog using the latest and correct setup process!


Comments